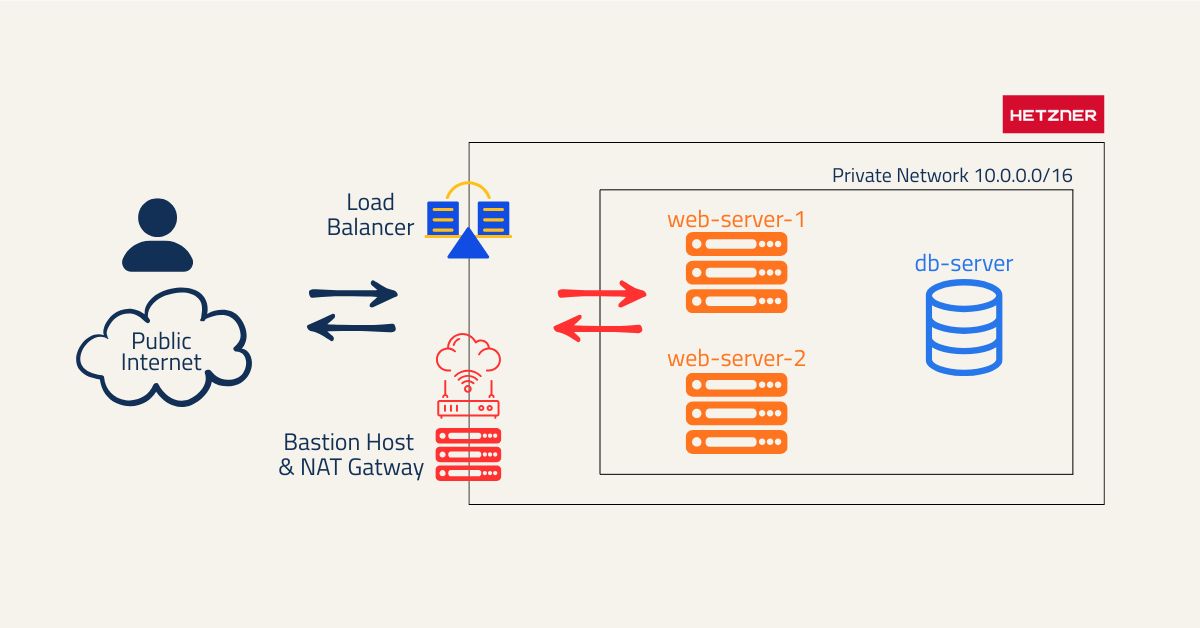

This project provides a complete guide to setting up a secure and scalable web application infrastructure on Hetzner Cloud. It explains how to configure a private network, a bastion host that functions as both a NAT gateway and a jump server, MariaDB and Nginx web servers on the private network, and finally, a load balancer to distribute traffic to the web servers. This guide emphasizes security best practices by isolating critical components from direct internet access and exposing only the load balancer to the public.
The steps in the plan are as follows:
- Create the Private Network and Servers: We’ll establish a secure network topology that isolates server communication from the public internet.
- Configure a Bastion Host/NAT Gateway: Set up a single server to act as a secure jump host for access and as a NAT gateway for outbound internet connections.
- Configure the MariaDB Server: Run a script to automate the installation and secure configuration of MariaDB.
- Configure Nginx Web Servers: Install and configure two Nginx web servers to serve content from the database.
- Deploy the Load Balancer: Set up the only public-facing component to efficiently distribute traffic to your web servers.
Create the Private Network in Hetzner Cloud
First, we need a private network for our servers to communicate without being exposed to the internet.
- Log in to your Hetzner Cloud Console.
- In your project, navigate to Networks on the left-hand menu.
- Click Create network.
- Name: Give it a descriptive name, like
private-net-corefortify.com. - IP range: You can leave the default
10.0.0.0/16. - Click Create network.
Make a note of the IP range you selected. All your servers will get a private IP address within this range (e.g., 10.0.0.2, 10.0.0.3, etc.).
Next, we’ll create the database and web servers. These servers will only have private IP addresses and will not be publicly accessible. This is why we will use a jump host to configure them and a NAT gateway to allow them to update their packages.
Repeat the following steps 3 times to create two web servers and one database server.
- In your Hetzner project, go to Servers and click Add server.
- Location: Choose your preferred server location.
- Image: Select AlmaLinux 10.
- Type: Choose a suitable type (e.g.,
CX23is a good starting point). - Networking:
- Public IPv4: DISABLE THIS. This is the most critical step for keeping the server private.
- Private Networks: Select the network you created (
private-net-corefortify.com).
- SSH key: Select your SSH key.
You should have the following private IPs for your servers:
| Server Name | Private IP |
|---|---|
db-server |
10.0.0.2 |
web-server-1 |
10.0.0.3 |
web-server-2 |
10.0.0.4 |
Configure the Bastion Host and NAT Gateway
This server will act as a bastion host for accessing the web and database servers. It will also function as a NAT Gateway, allowing the private servers to make outbound connections to the internet for software updates. To maintain a secure network, these servers will only be able to connect to the internet through the NAT Gateway, and all unsolicited inbound connections will be blocked.
For best practices, I strongly suggest separating the NAT Gateway function from the bastion host role in a production environment to enhance both availability and security.
Step 1: Create the Bastion Host
- Create a new, small server (e.g.,
CX23on AlmaLinux 10). - Enable the Public IPv4.
- Attach it to your private network (
private-net-corefortify.com). - Assign an SSH key.
- Name it
jump-host. - Note its Public IP address.
Step 2: Configure SSH Access via the Bastion Host
On your local machine, edit your SSH config file. This configuration allows you to connect directly to your private servers by automatically routing the connection through the Bastion Host.
nano ~/.ssh/config
Add the following configuration. This defines the Bastion Host and tells any connection to the private servers to use it as a jump point.
# --- Hetzner Bastion Host ---
Host jump-host
    HostName <jump-host-public-ip>
    User root
    IdentityFile    /home/ali/.ssh/hetzner
    ForwardAgent yes
    AddKeysToAgent yes

Host web-server-2
    HostName 10.0.0.4
    User root
    ProxyJump jump-host

Host web-server-1
    HostName 10.0.0.3
    User root
    ProxyJump jump-host

Host db-server
    HostName 10.0.0.2
    User root
    ProxyJump jump-host
Replace <jump-host-public-ip> with the actual public IP of your Bastion Host. The ForwardAgent yes line is crucial; it allows you to use your local SSH key to authenticate from the Bastion Host to the private servers.
Explanation of AddKeysToAgent yes
Without this line, you could log into the jump-host, but you would not be able to jump from there to your private servers. This is because the jump-host itself does not have your private key, which is stored safely on your local machine. The jump host has no keys to present to the private servers, so they will deny the connection.
This is the exact problem that SSH Agent Forwarding is designed to solve. It allows the jump host to “borrow” the authentication capability from your local PC’s SSH agent without ever seeing your private key.
Now, from your local machine, you can connect directly to the private servers through the jump host. Try it:
ssh db-server
ssh web-server-1
ssh web-server-2
Step 3: Configure the NAT Gateway on the Jump Host
From your local machine, connect to the jump host:
ssh jump-host
The following steps turn the Bastion Host into a router that forwards traffic from the private network to the internet.
Enable IP Forwarding Permanently:
# Run this on the Bastion Host
echo "net.ipv4.ip_forward = 1" >> /etc/sysctl.conf
sysctl -p
Enable Masquerading in the Firewall: This tells the firewall to perform Network Address Translation (NAT).
# Run this on the Bastion Host
dnf update -y
dnf install firewalld
systemctl enable --now firewalld
firewall-cmd --permanent --add-masquerade
firewall-cmd --reload
Step 4: Configure the Route in Hetzner Cloud Console
You need to tell the entire private network that your jump-host is the gateway to the internet.
- Go to your Hetzner Cloud Console.
- Select your project.
- In the left-hand menu, click on Network.
- Select the private network your servers are connected to.
- Click on the Routes tab.
- Click Add route.
- Fill in the details:
- Destination:
0.0.0.0/0(This targets all internet-bound traffic). - Gateway: Enter the private IP address of your
jump-host(e.g.,10.0.0.5).
- Destination:
This single change tells every server in that network: “To reach the internet, send your traffic to the jump-host.”
Step 5: Configure Persistent NAT and Routing
These steps detail the configuration for both the NAT server (Bastion Host) and the private client servers (db-server, web-server-1, web-server-2) to ensure settings persist across reboots.
5.1 On the NAT Server (Bastion Host)
Enable IP Forwarding:
echo 1 > /proc/sys/net/ipv4/ip_forward
Add NAT Rule:
iptables -t nat -A POSTROUTING -s '10.0.0.0/16' -o eth0 -j MASQUERADE
Achieve Persistent Configuration:
Install iptables-services (if not already installed):
yum install iptables-services -y
Create the NetworkManager dispatcher script:
nano /etc/NetworkManager/dispatcher.d/ifup-local
Add the following content:
#!/bin/sh
/bin/echo 1 > /proc/sys/net/ipv4/ip_forward
/sbin/iptables -t nat -A POSTROUTING -s '10.0.0.0/16' -o eth0 -j MASQUERADE
Make the script executable:
chmod +x /etc/NetworkManager/dispatcher.d/ifup-local
5.2 On the Private Client Servers (db-server, web-server-1, web-server-2)
Repeat these steps on every server within your private network.
Configure DNS Resolution:
Edit /etc/resolv.conf:
nano /etc/resolv.conf
Delete existing content and add Hetzner’s DNS resolvers:
nameserver 185.12.64.1
nameserver 185.12.64.2
Save the file, then make it immutable to prevent overwriting:
chattr +i /etc/resolv.conf
Add Default Route:
ip route add default via 10.0.0.1
Achieve Persistent Configuration:
Remove hc-utils to prevent conflicts:
dnf remove hc-utils -y
Create the NetworkManager dispatcher script:
nano /etc/NetworkManager/dispatcher.d/ifup-local
Add the following content:
#!/bin/sh
/sbin/ip route add default via 10.0.0.1
Make the script executable:
chmod +x /etc/NetworkManager/dispatcher.d/ifup-local
Apply All Changes: Restart the network service to apply the new route and DNS settings:
systemctl restart NetworkManager
After completing these steps, your private servers will have persistent internet access, allowing you to install packages and reach the internet through the NAT Gateway.
Configure the MariaDB Server
Before running this script on the MariaDB Server, remember to change the password. The following SQL commands will create a user and grant privileges to accept connections only from the private network.
sudo mysql -u root -p

GRANT ALL PRIVILEGES ON demodb.* TO 'demouser'@'10.0.0.%' IDENTIFIED BY 'SecurePass@2025';
FLUSH PRIVILEGES;
exit
Then, run the following script to automate the setup:
#!/bin/bash

# Exit immediately if a command exits with a non-zero status.
set -e

# --- Configuration Variables ---
DB_NAME="demodb"
DB_USER="demouser"
DB_PASSWORD="SecurePass@2025" # Replace with your actual secure password
ALLOWED_NETWORK="10.0.0.0/16" # Private network range

# --- Script Start ---
echo "--- Starting MariaDB Server Setup ---"

# Step 1: Update system packages
echo "--> Updating system packages..."
dnf update -y

# Step 2: Install MariaDB and Firewall
echo "--> Installing MariaDB server and firewalld..."
dnf install mariadb-server firewalld -y

# Step 3: Start and enable services
echo "--> Starting and enabling firewalld service..."
systemctl enable --now firewalld

echo "--> Starting and enabling MariaDB service..."
systemctl enable --now mariadb

# Step 4: Wait for MariaDB to initialize
echo "--> Waiting 5 seconds for MariaDB to initialize..."
sleep 5

# Step 5: Secure the installation and set up the database
echo "--> Configuring database, user, and table..."
mysql -u root <<MYSQL_SCRIPT
CREATE DATABASE IF NOT EXISTS ${DB_NAME};
CREATE USER IF NOT EXISTS '${DB_USER}'@'${ALLOWED_NETWORK}' IDENTIFIED BY '${DB_PASSWORD}';
GRANT ALL PRIVILEGES ON ${DB_NAME}.* TO '${DB_USER}'@'${ALLOWED_NETWORK}';
FLUSH PRIVILEGES;
USE ${DB_NAME};
CREATE TABLE IF NOT EXISTS demotable (
    id INT AUTO_INCREMENT PRIMARY KEY,
    message VARCHAR(255) NOT NULL,
    created_at TIMESTAMP DEFAULT CURRENT_TIMESTAMP
);
-- Insert data only if the table is empty to avoid duplicate entries on re-runs
INSERT INTO demotable (message)
SELECT 'Hello from the private database server!'
WHERE NOT EXISTS (SELECT 1 FROM demotable);
MYSQL_SCRIPT
echo "--> Database configuration complete."

# Step 6: Configure the firewall
echo "--> Configuring firewall to allow MariaDB connections from the private network..."
firewall-cmd --permanent --zone=public --add-rich-rule="rule family='ipv4' source address='${ALLOWED_NETWORK}' port protocol='tcp' port='3306' accept"

# Reload the firewall to apply the new rule immediately
firewall-cmd --reload
echo "--> Firewall configured."

# --- Script End ---
echo ""
echo "--- MariaDB server setup is complete and secure! ---"
echo "Database '${DB_NAME}' and user '${DB_USER}' are ready."
Configure the Nginx Web Servers (web-server-1 & web-server-2)
Run the following script on both web-server-1 and web-server-2.
#!/bin/bash

# --- Configuration: Set your variables here ---
DATABASE_IP="10.0.0.2"
DB_USER="demouser"
DB_PASS="SecurePass@2025" # Replace with your actual secure password
DB_NAME="demodb"
# ------------------------------------------------

# Exit immediately if a command exits with a non-zero status.
set -e

echo "Updating system packages..."
dnf update -y

echo "Installing required packages: Firewall, Nginx, MariaDB client..."
dnf install firewalld nginx mariadb -y

echo "Allowing Nginx to make network connections (SELinux)..."
setsebool -P httpd_can_network_connect_db 1

echo "Starting and enabling Nginx..."
systemctl start nginx
systemctl enable nginx

echo "Configuring firewall to allow HTTP traffic..."
systemctl start firewalld
systemctl enable firewalld
firewall-cmd --permanent --zone=public --add-service=http
firewall-cmd --reload

echo "Fetching data from the database..."
# The --silent (-s) and --skip-column-names (-N) flags make the output cleaner.
DB_MESSAGE=$(mysql -h "$DATABASE_IP" -u"$DB_USER" -p"$DB_PASS" "$DB_NAME" -sN -e 'SELECT message FROM demotable WHERE id = 1;')

if [ -z "$DB_MESSAGE" ]; then
    echo "Error: Failed to fetch message from the database. Please check credentials and network."
    exit 1
fi

echo "Creating custom index.html file..."
HOSTNAME=$(hostname)

cat > /usr/share/nginx/html/index.html <<EOF
<!DOCTYPE html>
<html lang="en">
<head>
    <meta charset="UTF-8">
    <title>Hetzner Private Network Demo</title>
    <style>
        body { font-family: Arial, sans-serif; text-align: center; margin-top: 100px; background-color: #f0f2f5; }
        .container { background-color: #ffffff; padding: 40px; border-radius: 8px; display: inline-block; box-shadow: 0 4px 8px rgba(0,0,0,0.1); }
        h1 { color: #333; }
        p { color: #555; font-size: 1.2em; }
        .db-data { font-weight: bold; color: #007bff; }
        .server-info { margin-top: 20px; font-size: 0.9em; color: #777; }
    </style>
</head>
<body>
    <div class="container">
        <h1>Welcome!</h1>
        <p>Message from Database: <span class="db-data">${DB_MESSAGE}</span></p>
        <p class="server-info">Served by: ${HOSTNAME}</p>
    </div>
</body>
</html>
EOF

echo "Nginx web server setup is complete."
Deploy and Configure the Load Balancer
This is the final piece. The Load Balancer will have a public IP and will forward traffic to your two private web servers.
- In your Hetzner project, go to Load Balancers and click Create load balancer.
- Name: Give it a name, like
web-lb. - Location: Choose the same location as your servers.
- Network: Select your private network (
private-net-corefortify.com). - Type: Choose a suitable type (e.g.,
LB11). - Services (Routing):
- Click Add service.
- Protocol:
HTTP - Source port:
80 - Destination port:
80
- Targets:
- In the “Targets” section, click Select targets.
- Add both of your web servers (
web-server-1andweb-server-2). - Ensure Use private IP is checked for both.
- The default health check over HTTP on port 80 is perfect for this setup.
- Algorithm:
- I prefer Least Connections.
- Click Create & Buy now.
Step 5: Verification
You’re all set! Now, let’s test it.
- Go to the Load Balancers section in your Hetzner console.
- Find the public IP address of your new load balancer.
- Open a web browser and navigate to that IP address (e.g.,
http://YOUR_LB_PUBLIC_IP).
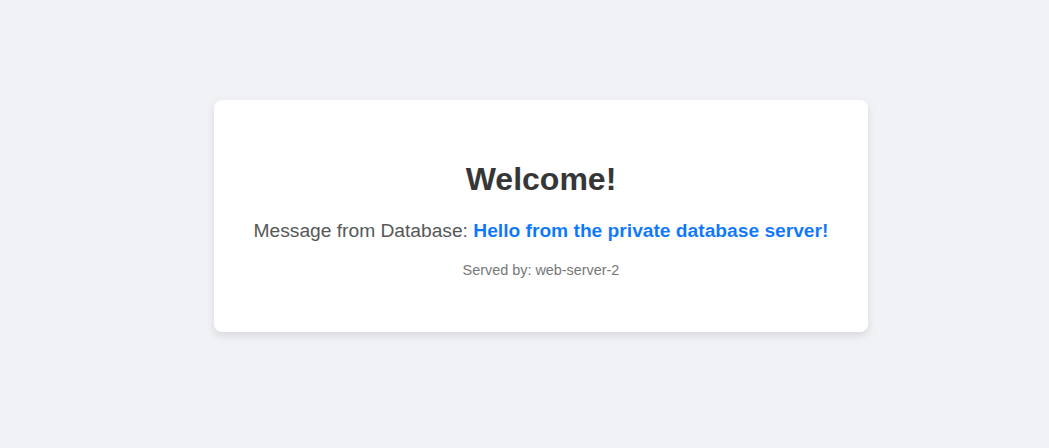
You should see the webpage with the message “Hello from the private database server!”. If you refresh the page a few times, you will see the “Served by:” hostname change between web-server-1 and web-server-2, demonstrating that the load balancer is working correctly.
Conclusion
You have now successfully deployed a secure and scalable web application environment on Hetzner Cloud. This architecture, featuring a private network, a multi-role bastion host, and a load balancer, effectively protects your internal traffic, controls external access, and efficiently distributes requests to your backend services.